

Hello, and welcome to liv.rent! This is our complete user guide to our platform as a property manager or landlord.
Whether you manage a large portfolio of rental units or you’re just getting started as a new landlord, everything you need to get started and to thrive is in this guide. Bookmark it, email it to yourself, and keep it handy to help you become an expert at streamlining your rental processes.
Before we dive into all our features, know that you can use our platform based on your needs (i.e. you don’t have to use all the features, just pick the ones you need.)
Whether you want to automate your entire rental process or you’re only interested in one of our features like contract creation or listing syndication, we make it possible.
Pro tip: want the TL;DR? Read our Quick Start Guide: 3 Keys To Listing & Renting Efficiently.
Get expert renting tips
Learn how to get the most out of liv.rent’s all-in-one tenant screening, marketing, and digital contract tools with a FREE 30-minute demo.
1. Getting started
Download the app
You might be tired of hearing “there’s an app for that,” but the liv.rent app can instantly connect you with your tenants and leads to avoiding the headache of having communication spread out across email, phone, and texting.
With the app, you’ll be notified any time there’s been:
- an inquiry
- an application
- a rent payment has been received
Plus, when you head to your unit for a showing, you will have all the documents you need in your pocket — no paperwork necessary.
Book a free demo
Landlords and property managers can book a free 30-minute discovery demo with Paula Azevedo, liv.rent’s Business Development Manager.
This is a good way to learn about the platform and how you can use it to your advantage. Together, we’ll explore your profile and talk about your unique needs to show you how our solutions can help you streamline your rental process.
During the call, our team can walk you through a live demo. We’ll show you how to post a listing, browse suggested tenants, syndicate listings, and review applications. And, later down the rental process, we can show you how to create contracts and send payment requests.
Get verified
Watch now: Landlord Onboarding — 3 Keys To Success
Getting verified on liv.rent is your biggest key to success. In fact, all published listings on our platform with unverified profiles will be hidden within a week to help keep our community safe by protecting against identity theft or fraud occurrences.
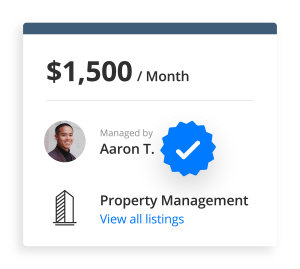
Both your profile and your listings can be verified.
>> Verify your profile
Once your identity has been confirmed, our records of your government-issued photo ID and all copies of authentication information are immediately and securely destroyed. Then, you will have earned your blue checkmark verification badge and can officially start your journey towards simplified renting.
Fill out your profile completely, including a photo. For personal and family accounts, you can share your government-issued ID securely through the liv.rent platform. For business accounts, we also require a copy of your business license.
Our team will then conduct a strict verification process, during which your selfie photo will be requested to match your documents and confirm your identity.
>> Verify your listing
Verify your listings for a competitive advantage on liv.rent and prove your trustworthiness as a landlord or property manager to renters. There are two ways to verify your listing:
Note: liv.rent will hide suspicious or duplicate listings until we have verified the listing.
- Document verification
- We check official documents such as property tax forms and land title documents, or representation documents.
- Mail verification
- We will mail a postcard to the rental property that includes a code for landlords to enter into the app to finalize verification.
Learn more:
2. Listing your rental
Add your first listing
Your listing is where your entire rental journey on liv.rent begins. In your landlord dashboard, on the “Listings” page, you can click the button “Create new listing” to get started.
- Select property and rental space types.
From here, you’ll be able to select the property type:- Apartment
- House
- Townhouse
- And a rental space that best defines your unit:
- Entire apartment
- Partial apartment
- A single room
- Provide your address details.
Simply start by typing in the address and your building information from our database will appear. You can also opt to hide the unit number to protect your information. - Enter additional details.
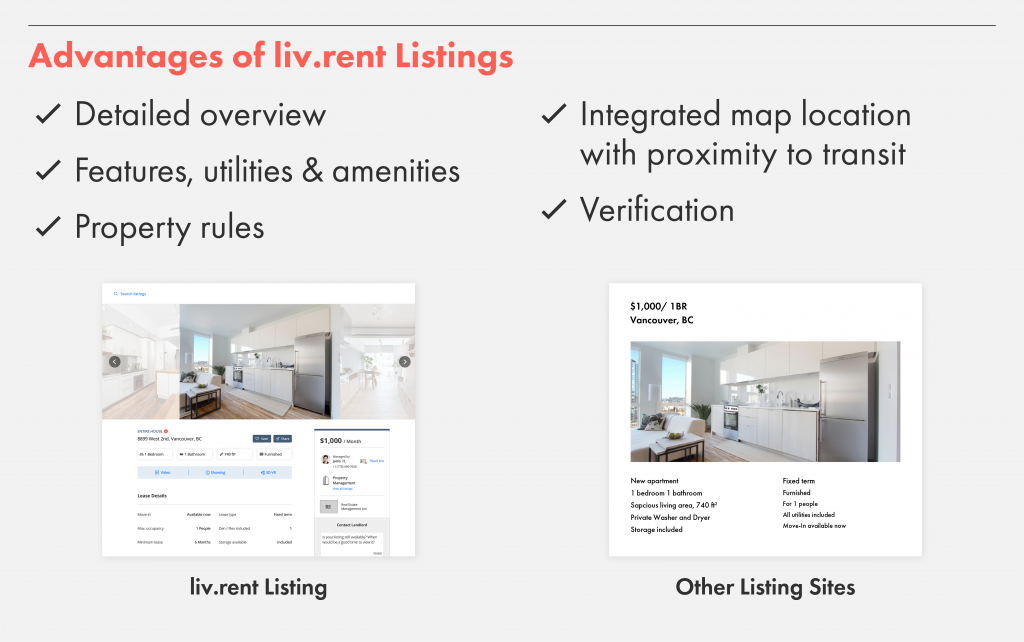
We have carefully refined the process to include all the relevant information renters will want to know about your unit to help save time and energy – eliminating the back and forth communication regarding your suite. Additional details include things like:- Unit size
- Number of bedrooms & bathrooms
- Smoking & pet policies
- Lease terms
- Features included
- Utilities
- Parking & storage
- Description
- Photos & video tours
3. Marketing your listing
Landlord dashboard
The landlord dashboard brings together everything you need to know about your listings in one simplified view. Here are just a few of its many functions:
- Digital filing cabinet
- Storage of all your rental documents and chat history with tenants.
- Listing insights
- Smart market rental rate comparisons for similar units, helping you to price accordingly.
- Listings management
- A summary overview of all your active listings and their current status.
- Applicant comparison
- Compare applicants to your unit by key data like profession and desired move-in date.
- 3D VR property tours
- Your home base for uploading virtual 3D or VR tours of your listings.
- Private notes
- Landlords, property managers, and agents can add their notes to listings.
- Suggested tenants
- Auto-suggested renters whose preferences match your unit.
Learn more:
Centralize leads to liv.rent
Power users of our platform use it as their digital rental hub where they bring together all leads from different channels and funnel them to liv.rent, so, in other words — your liv.rent listing is your home base where you can direct all your leads.
So, if you get a phone call about the unit or message from Facebook Marketplace, you can direct them to your liv.rent listing and ask that they apply through this portal.
Not only does this ensure that you’re dealing with serious inquiries only (remember: when it comes to leads, quality is better than quantity,) but now you can also take advantage of our features to screen tenants with ease.
Pro tip: If you have more than one listing on liv.rent, you can share your landlord profile with leads no matter where you connected so they can see all your listings available at a glance.
Listing syndication
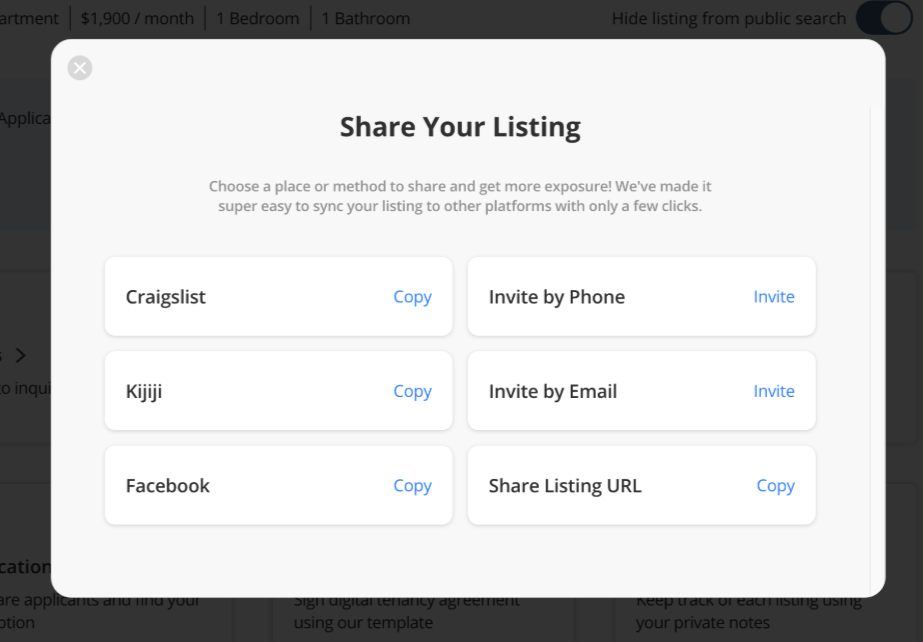
Maximize your listing’s exposure with our easy-to-use syndication feature. With liv.rent, you can fill out your listing once and push it out through our multi-channel syndication.
On your listing, you can click “share.” Then, you’ll have the option to publish it to Craigslist, Kijiji, and Facebook Marketplace easily.
Featured listings
liv.rent can help your listing receive the attention it deserves with all its tools. However, our featured listings are the fastest way to see results because they can increase:
- Listing views by 300%
- Inquiries and applications by 65%
Pro tip: If you are interested in the featured listings package, you can reach our team today.
4. Tenant screening
The Trust Score
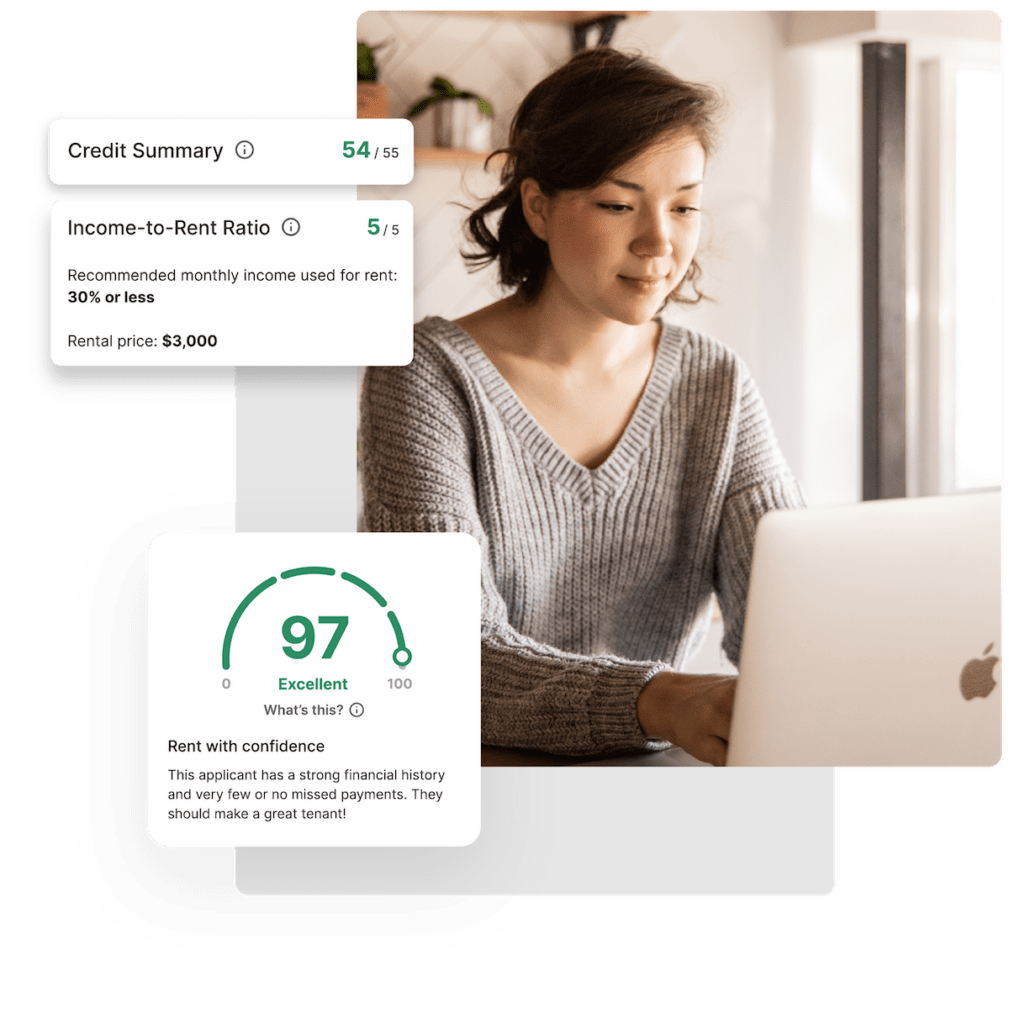
Renters on the liv.rent platform can complete their profiles by getting a Trust Score, a comprehensive indicator of their credibility as a renter. By integrating our own data with information from Equifax® credit checks, we’re able to provide landlords with more comprehensive information to help them quickly & reliably gauge applicants’ suitability:
- Credit information from Equifax®
- Income-to-rent ratio
- Court record verification (where applicable)
- Number of accounts checked to qualify their payment record
- Collections record
- Bankruptcy index
- Detailed risk assessment
- Credit utilization
Plus, their Trust Score score shows you:
- Which piece of ID they use for Identification Verification
- Their social verification through their LinkedIn profile
- Income & employment verification including:
- T4s
- Paystubs
- Employment letters
Learn more:
Suggested tenants
When you post your listing, we will automatically create a list of prospective tenants. This is generated by matching tenants’ indicated preferences with your listing details.
You can filter your suggested tenants as well, choosing only from those who have verified their profiles and completed them in full.
Learn more:
Expert-level tips
Finally, if you’re still looking for ways to level up your rental processes, then you should join our Facebook communities for landlords. Join our Landlords & Property Managers Facebook Communities for:
liv.rent also frequently offers live webinars and mini-trainings about using the platform and beyond. Visit our Eventbrite page to sign up for the next event.
Read More: Ask An Expert: Klaus Rode On Toronto Rentals
5. Lease agreements
Digital contracts
A paperless rental process saves you time and trees. Adopting our digital contracts can help you eliminate the stress and uncertainty of navigating the B.C. and Ontario standard lease agreements, ensuring a more error-free application process.
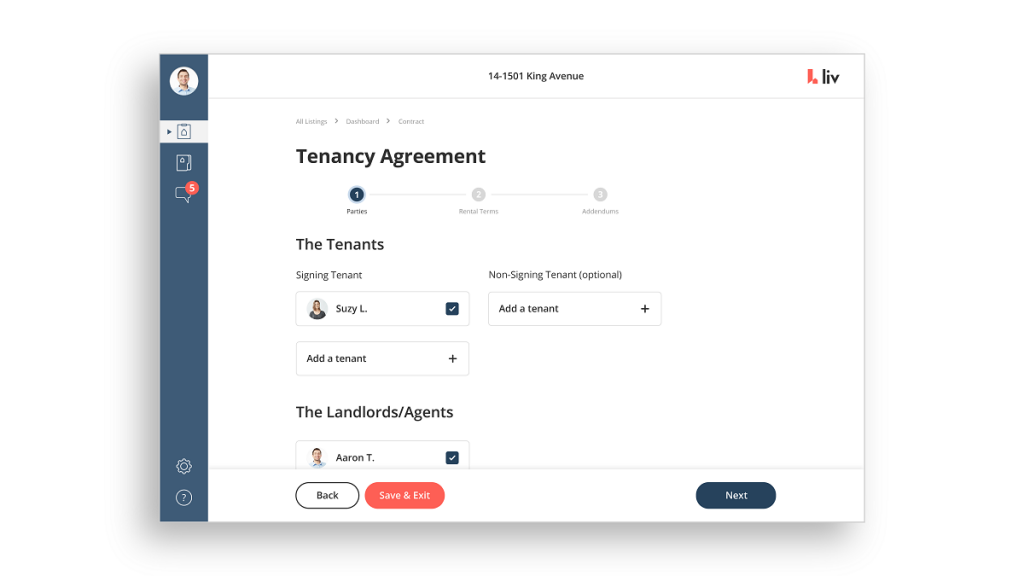
With an easy-to-use interface, you can create and save reusable customized addendums for you and your tenant with just a few clicks.
Custom addendum templates are extremely helpful, especially for first-time landlords, and they will be auto integrated into your digital B.C. or Ontario standard lease agreement.
Once the contract is ready for signing, send it to your tenant in your chat timeline together so they can add their e-signature. These are true contracts, and as such, these hold the same binding power as paper documents. After signing, the contract is saved securely for you on our platform. You’re able to access it at any time, even on the go with our app.
Pro tip: liv.rent can assist in custom contract creation for business and enterprise users.
Learn more:
Lease extensions on liv.rent
Check your lease to see what you and your tenant had agreed upon at the end of the fixed-term lease.
Typically, at the end of a fixed-term tenancy, your tenant will by default transition to a month-to-month lease in B.C. and Ontario.
If this is the case, then the lease is automatically extended for you, unless of course either the landlord or tenant gives notice that they intend to end the lease when the term is finished. You may ask a tenant to sign another fixed-term lease, but you cannot compel them to do so.
Using liv.rent, it’s easy to extend or renew a lease for a fixed term by going to your tenant dashboard. Under “tenancy” and “resources,” you can find the option to renew the contract.
At this point, the old lease will be duplicated with new revised dates plus any additional information or changes. You can then send it in your chat to the tenant for them to sign and send back.
Ending a lease on liv.rent
If you have decided to end your lease and have the legal grounds to do so (check your lease and your local guidelines to ensure compliance,) then you can use liv.rent to end the lease.
Under “tenancy” and “resources,” select “end tenancy.” Then, you’ll have to pick the date on which you would like to end the tenancy.
Next, your tenant can choose one of three options:
- I do not want to end tenancy
- Agree to end tenancy
- Request Liv Support
Note: all parties who have signed the lease agreement must agree to end the tenancy for it to be concluded.
>> Forcing the end of a tenancy
There’s also an option to “Force End Tenancy,” which comes up when landlords have sent a request to end the tenancy and the tenant is unresponsive.
They must indicate the reason why they are forcing the end of the tenancy. Then, this completes the process and the unit can now be rented again to the next prospective tenants.
Learn more:
- Landlord Guide: How to End or Extend a Tenancy Agreement
- Ending a Tenancy on liv.rent
- How To Relist A Property
- Provincial guidelines for renting in Ontario / B.C.
6. Digital storage locker
Chat history
Forget Facebook messages, emails, phone calls, and texts. When you use the liv.rent platform for all your communication with leads, applicants, and tenants — everything you need is right at your fingertips.
With our chat feature:
- Prospective tenants can ask questions about listings.
- Renters can send applications through the chat.
- Landlords can share additional information about their units and ask questions.
- Landlords can send lease agreements.
- Renters can sign lease agreements and send them back to landlords.
Keeping everything in a centralized channel means that you’ll never miss a piece of communication and you’ll have all the relevant info you need to take care of your property on hand.
Rental payments
Rent payments can be accepted through the liv.rent platform, too. Imagine that you no longer have to organize and cash cheques — instead, you simply send a payment request to your tenant in the chat timeline and they’ll pay it.
Renters have the option to pay for rent with credit card (Visa, MasterCard, Amex,) by UnionPay, and even by bitcoin. There are two ways to use liv.rent to collect rent payments from your tenants:
- If your tenant is paying by Visa, Mastercard, or American Express, then you can accept payments through Stripe. Connect your Stripe account with liv.rent and when tenants make payments, it will be deposited into your Stripe account, which pays it out to your bank account.
- If your tenant chooses to pay by UnionPay or bitcoin, then you can set up a direct deposit by putting your bank account information in your liv.rent profile.
Learn more:
Continuing landlord & property manager education
Thank you for conferring with our guide. We hope you now have a good understanding of the liv.rent platform, along with its tools and benefits. Next, we invite you to:
- Subscribe to liv.rent updates to be the first to learn about new rental market data, platform features, and more
- Book a free 30-minute discovery demo with our team
- Explore our liv.rent resource blog for more assistance for landlords

Rethink The Way You Rent
Not on liv.rent yet? Experience the ease of digital applications & contracts, verified tenants & landlords, virtual tours and more – all on one platform. Sign up for free or download the app.
Subscribe to receive the latest tenant & landlord tips and get notified about changes in the Canadian rental market.
>> Stay up-to-date on the average rent in Vancouver, Toronto and Montreal: Rent Reports.


0 Comments